The OSSMConsole CR
OpenShift ServiceMesh Console (aka OSSMC) provides a Kiali integration with the OpenShift Console; in other words it provides Kiali functionality within the context of the OpenShift Console. OSSMC is applicable only within OpenShift environments.
The main component of OSSMC is a plugin that gets installed inside the OpenShift Console. Prior to installing this plugin, you are required to have already installed the Kiali Operator and Kiali Server in your OpenShift environment. Please the Installation Guide for details.
The Kiali Operator watches the OSSMConsole Custom Resource (OSSMConsole CR), a custom resource that contains the OSSMC deployment configuration. Creating, updating, or removing a OSSMConsole CR will trigger the Kiali Operator to install, update, or remove OSSMC.
Creating the OSSMConsole CR to Install the OSSMC Plugin
With the Kiali Operator and Kial Server installed and running, you can install the OSSMC plugin in one of two ways - either via the OpenShift Console or via the “oc” CLI. Both methods are described below. You choose the method you want to use.
Installing via OpenShift Console
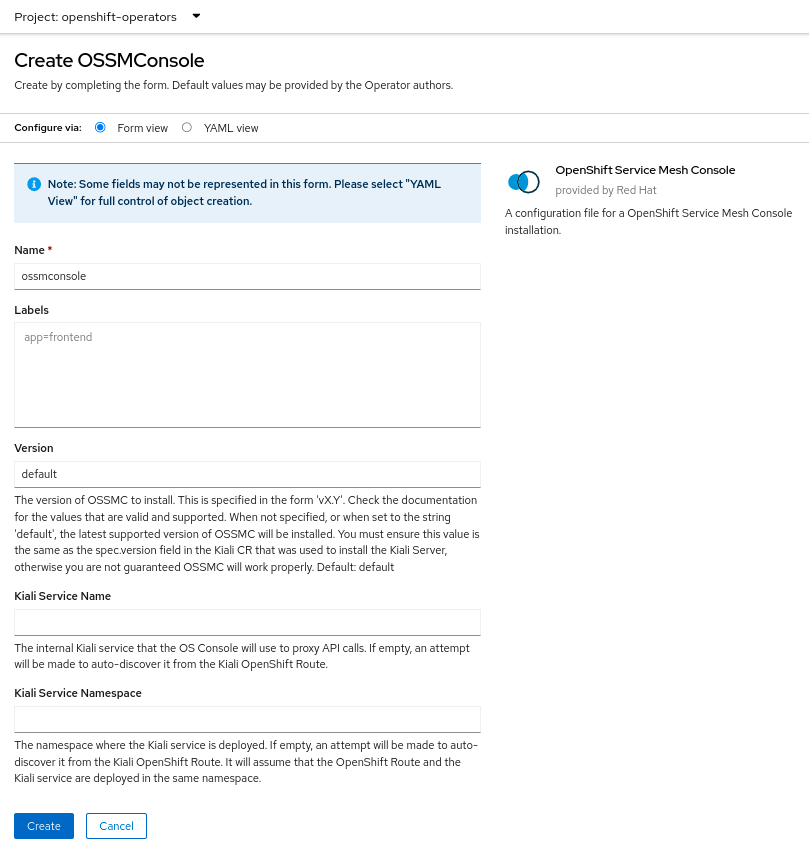
From the Kiali Operator details page in the OpenShift Console, create an instance of the “OpenShift Service Mesh Console” resource. Accept the defaults on the installation form and press “Create”.

Installing via “oc” CLI
To instruct the Kiali Operator to install the plugin, simply create a small OSSMConsole CR. A minimal CR can be created like this:
cat <<EOM | oc apply -f -
apiVersion: kiali.io/v1alpha1
kind: OSSMConsole
metadata:
  namespace: openshift-operators
  name: ossmconsole
EOM
Note that the operator will deploy the plugin resources in the same namespace where you create this OSSMConsole CR - in this case openshift-operators but you can create the CR in any namespace.
For a complete list of configuration options available within the OSSMConsole CR, see the OSSMConsole CR Reference.
To confirm your OSSMConsole CR is valid, you can utilize the OSSMConsole CR validation tool.
Installation Status
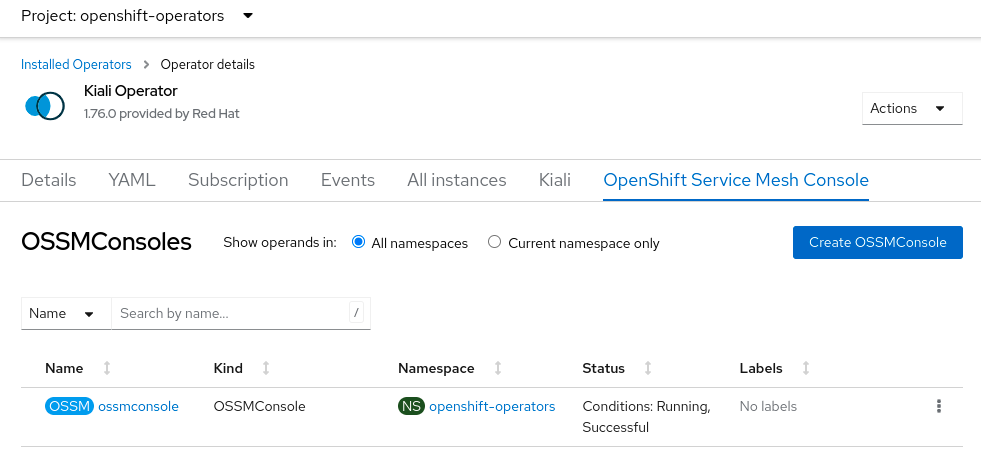
After the plugin is installed, you can see the “OSSMConsole” resource that was created in the OpenShift Console UI. Within the operator details page in the OpenShift Console UI, select the OpenShift Service Mesh Console tab to view the resource that was created and its status. The CR status field will provide you with any error messages should the deployment of OSSMC fail.

Once the operator has finished processing the OSSMConsole CR, you must then wait for the OpenShift Console to load and initialize the plugin. This may take a minute or two. You will know when the plugin is ready when the OpenShift Console pops up this message - when you see this message, refresh the browser window to reload the OpenShift Console:

Uninstalling OSSMC
This section will describe how to uninstall the OpenShift Service Mesh Console plugin. You can uninstall the plugin in one of two ways - either via the OpenShift Console or via the “oc” CLI. Both methods are described in the sections below. You choose the method you want to use.
oc patch ossmconsoles <CR name> -n <CR namespace> -p '{"metadata":{"finalizers": []}}' --type=merge
Uninstalling via OpenShift Console
Remove the OSSMConsole CR by navigating to the operator details page in the OpenShift Console UI. From the operator details page, select the OpenShift Service Mesh Console tab and then select the Delete option in the kebab menu.

Uninstalling via “oc” CLI
Remove the OSSMConsole CR via oc delete ossmconsoles <CR name> -n <CR namespace>. To make sure any and all CRs are deleted from any and all namespaces, you can run this command:
for r in $(oc get ossmconsoles --ignore-not-found=true --all-namespaces -o custom-columns=NS:.metadata.namespace,N:.metadata.name --no-headers | sed 's/ */:/g'); do oc delete ossmconsoles -n $(echo $r|cut -d: -f1) $(echo $r|cut -d: -f2); done